Wood and Center joints
1) Center joint of the top plate – Part one – Wood selection and preparation of the pieces
2) Center joint of the back plate – Part one – Wood selection and preparation of the pieces
3) Center joint of the violin plates – Precautions for the vice and planes used
4) Center joint of the top – Part two – Setting up and finishing the joint
5) Center joint of the back – Part two – Setting up and finishing the joint
6) Center joint of the plates – Gluing
Gluing system for the center joints of back and belly (old short version)
Violin center joints from start to finish (condensed version)
Outline tracing
Positioning of the placement pins and tracing the outline of the back
Positioning of the placement pins and tracing the outline of the top
Back plate roughing
Roughing of the outline and marking the edges thickness
Roughing of the back part one : initial roughing with gouge
Roughing of the back part two : setting the sixth (long arch)
Roughing of the back part three : setting of the fifths and edge platform
Roughing of the back part four : blending of the fifths
Roughing of the back part five : final fingerplane working
Top plate roughing
Roughing of the top plate part one : initial roughing with gouge
Roughing of the top plate part two : setting the sixth
Roughing of the top plate part three : final roughing with gouge
Roughing of the top plate part four : final roughing with fingerplane
Outline of the edges
1) Outline of the edges part one – thickness of the ledge
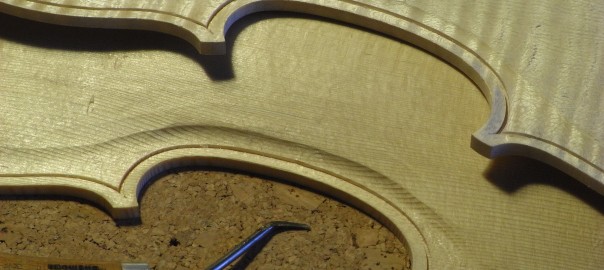
2) Outline of the edges part two – Finishing the outline of the back plate
3) Outline of the edges part three – Finishing the outline of the top plate
Purfling and edge fluting channel
Making (gluing) purfling strips
Cutting the fluting channel on the back plate
Cutting of the fluting channel on the top plate
0) Violin purfling from start to finish (condensed)
1) Purfling part one : tracing and cutting of the purfling channel
2) Purfling part two : hollowing of the purfling channel
3) Purfling part three : preparing, cutting and bending of the purfling strips
4) Purfling part four : cutting and fitting of the mitres
4) Purfling part four (addendum) : purfling joints
5) Purfling part five : gluing the purfling
6) Purfling part six : finishing the purfling
7) Top plate : Tracing, cutting and hollowing the purfling channel
Back plate arching
Violin back arching from start to finish (condensed)
Back arching : gouge carving (long version)
Back arching : gouge carving (short version)
Back arching : fingerplane working (long version)
Back arching : fingerplane working (short version)
Back arching : scraper working part one
Back arching : scraper working part two
Back arching : scraper working part three – finishing of edge fluting and purfling
Back arching : scraper working part four – final finish of the surface
Top plate arching
Violin top plate arching from start to finish (condensed)
Top arching : fingerplane working part one
Top arching : fingerplane working part two
Top arching : scraper working part one
Top arching : scraper working part two – finishing of the channel
Top arching : scraper working part three – final finishing
Top arching : Appendix – use of the profilometer to detect and draw the fifths and the sixth
Top and Back plates thicknesses
Top and Back thicknesses – Appendix – Modes and Tap tones
Back plate thicknesses
1 – Back thicknesses part one – Gouge roughing – Creation of the channels
2 – Back thicknesses part two – Gouge roughing – Linking the channels
3 – Back thicknesses part three – Fingerplane working
4 – Back thicknesses part four – Setting the thickness with scraper
5 – Back thicknesses part five – Fine tuning of the thickness with scraper
6 – Back thicknesses from start to finish (condensed)
Top plate thicknesses
1 – Top plate thicknesses part one – Gouge roughing
2 – Top plate thicknesses part two – Fingerplane working
3 – Top plate thicknesses part three – Scraper working
4 – Top plate thicknesses part four – Fine tuning of thicknesses with scraper
5 – Top plate thicknesses from start to finish (condensed)
6 – Appendix: Application of the protein size inside the top
Cutting of the soundholes
Soundholes cutting from start to finish (condensed)
Cutting of the soundholes part one : drawing the eye position
Cutting of the soundholes part two : cutting the eyes and marking the stems
Cutting of the soundholes part three : cutting of stems with fretsaw
Cutting of the soundholes part four : cutting of stems with knife
Cutting of the soundholes part five : finishing of F-holes and cutting of notches
Bassbar
0) Bassbar from start to finish (condensed)
1) Bassbar part one : wood preparation
2) Bassbar part two : placement and frame
3) Bassbar part three : roughing and placement cleats
4) Bassbar part four : fitting
6) Bassbar part six : profile shaping
7) Bassbar part seven : rounding and finishing
Edge rounding
0) Edgework from start to finish
1) Rounding of the edges part one – Theory
2) Rounding of the edges part two – Inside chamfer
3) Rounding of the edges part three – Outside chamfer
4) Rounding of the edges part four – Final rounding
5) Rounding of the edges part five – Edge finishing and rounding of the corner’s tips
6) Rounding of the edges part six – Top plate
Soundbox
How tight should the clamps be?
0) Gluing the violin back and apply the inside treatment from start to finish
1) Gluing of the back part one – Dry positioning of the clamps (without glue)
2) Gluing of the back part two – Gluing with hot hide glue
3) Gluing of the back part three – Endpin hole
4) Gluing of the back part four – Inside treatment application
5) Gluing of the back part five – Inside finishing and detection of vibration modes
6) Closing of the soundbox part one : positioning of the top plate without glue
7) Closing of the soundbox part two : Gluing of the top plate
Violin saddle from start to finish (condensed)
1) Lower saddle part one – Preparation of the ebony block
2) Lower saddle part two – Cutting the housing and fitting the saddle
3) Lower saddle part three – Initial shaping before gluing